We know how important audio compression is for both recording and mastering processes. A job well done will make an audio track sounds lively, well balanced, bringing out the details that the audience would better appreciate. But to carry on such a task usually requires someone with years of experience and be trained in sound engineering. The cost of such a professional service (not to forget to mention the renting of equipment) is usually too high for hobbyists whose end products’ commercial value may not justify the cost, yet.
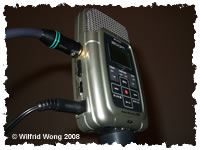
I have been writing songs as a hobby since 1995. Ever since my band “No Eye Candy” was formed since 2004, we have been actively recording our work in my humble home studio as well as the jamming studios in town. At times we do track-by-track recording; at times we mix all our instruments via a mixer and feed the single track sound signal into the computer; at times we bring along our Zoom H2 (see picture above) to record the jamming sessions directly via its 4-channel condenser mics.
I don’t claim to be an expert in audio compression but I do have a passion in giving the audio tracks of mine some justice and make them sound as good as they should be. I find that most materials I read on the Internet and external references are either too dry or too technical or too brief. What I aim to do here is to give you sufficient information with illustrations so that you can immediately make a difference to your work of art – be it as Podcast, video recording, music recording, and etc.
I know your time is precious and you want fast results. Here is my approach:
- Demystify the nuts and bolts of a compressor. So that you can understand what you are playing with and what I am talking about.
- Show you the waveforms of some of the professional works. So that you know what the end results may look like.
- Show you a set of industrial standard vintage compressors and what they do to a same piece of music. So that you can immediately pick some of these settings and try them on your own work.
- Share with you some of the potential compressor settings for instruments such as electric guitar, bass guitar, keyboard, drums, and vocals.
Do feel free to leave comments on this page as I’d love to hear from you as well.
| Next Page > | ||
9 replies on “Audio Compression for Beginners: Setting Compressor Threshold, Ratio, Knee, Attack, Release, and More”
[…] friends at Facebook know that I have been working on this rather mammoth article on “Audio Compression for Beginners” for days. The reasons why I am always so passionate towards sharing what I’ve learned are […]
[…] for the front and rear channels. I have covered the technique compression extensively in one of my articles. It’s time to put it to work and have the post-production work done at the […]
Thank you for de-mystifying the compressor – you’re very knowledgeable in that regard. Armed with this new-found glory, I may even trade in my software processor (finally) for some top $$, hard-line equipment. Kudos to you and much luck and success to your own band in the future!
Soloman – Thank you for your kind words. Do let me know how goes your hand-line equipment and share your experience too if you can!
Have a nice day.
Thank you for this. Our church band (EWB – Early mourning Worship band) is recording our anthems and some of our gigs at other churches using a PCM-D50 but we have found the detail is not there. I used the dynamics function on Sound Forge Studio last night using your settings and wow what a difference; you can hear so much more. I have had many multitrack recorders but compression mystified me. Next I need to look into using the Compression feature on my Line6 flextone amp. It does not have all the variables but I sure would like to have a tighter volume when I play. Thanks again
Andy – Thanks for dropping by. It is good to hear that you have a better recording with a different setting. Compression does help a lot in terms of bringing out the right details. With experience, I am sure you can find the right ‘template’ for your church band.
God bless.
This helped me, thanks for sharing that helpful information.
Re: Waveforms.
It is clearly time for waveforms to start getting smaller and for volume controls to be turned up higher. Get things back into the proper electrical perspective.
It is not the peaks of the waveforms, but the average levels which turn them into ‘sausages’, or as we techies call them ‘brick turds’. 😀
My early 1990s and before CDs are examples of non-brick wall mastering and I can really crank them up. My stereo never sounds strained and the music comes to life. Imagine what ‘Imagine Dragons’ or the latest by Nicki Minaj would sound like processed ’70s-80s style – without the brick wall & gain squashing done today! 🙂
Sorry to see my submission regarding your waveforms page was rejected.
I’ll just summarize: It is time for waveforms to start getting smaller and more dynamic, and for volume knobs to be turned up higher.
Think in terms of voltage and not how loud it is. The volume knob(in analogue terms) is akin to a faucet. The full power of your amp/stereo is always at the ready. It is expecting a specified range of voltage to drive it.
A song that has a high RMS(avg) might exceed the peak input of that amp, and it will stay clipped no matter where one sets the volume.
Time to return to the less compressed, non-brick wall limited mastering that existed prior to the mid-1990s. Your stereo, and your iPod, will thank you!